What separates chair yoga from traditional yoga poses involves the latter on a chair, instead of on a mat. Yes, that’s the only difference. Well, mostly. But it is accompanied by a different set of benefits for your body. Any armless chair will work for you – one that is low enough to allow your feet to touch the floor and enable your thighs to be parallel to the ground. If your chair is too low for this, prop your legs up so your feet are at 90-degrees to the ground.
Before we start discussing 10 chair yoga poses, know more about the benefits of this yoga asana.
6 Benefits Of Chair Yoga
Below are the chair pose benefits:
- Improves mobility, flexibility, strength, endurance, balance and ease of movements without support and stability.
- Enhances blood circulation in the nerves, proving to be especially beneficial for people with neurological disorders.
- Aids in controlling strain on the joints.
- Helps lose weight and is specifically recommended to keep obesity under control.
- Alleviates symptoms of stress-related mental disorders like anxiety and depression, thus, boosting your mood.
- Improves the quality of your sleep.
- Effective in improving concentration levels.
- Relieves pain and fatigue of joints, healing joint-related health conditions like osteoarthritis.
- An often recommended option for those who cannot perform other fitness activities or are bound to the chair.
11 Chair Yoga Asanas For Various Health Concerns
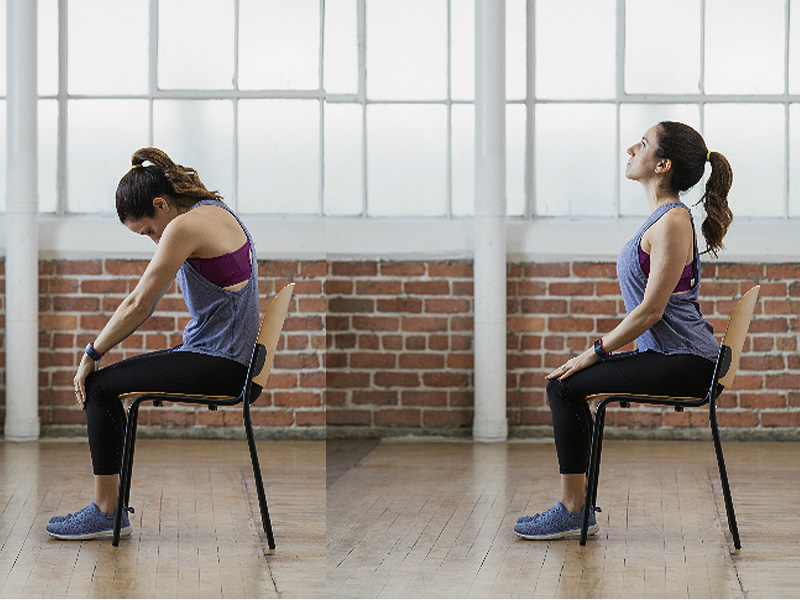
1. Bitilasana Marjaryasana (Seated Cat-Cow)
- Sit up straight on a chair with the hands on your thighs – right hand on the right thigh and the left hand on the left thigh. Inhale.
- While exhaling, slump a little, to pull your abdominals into your spine, while tucking your chin into your chest and tuck your tail under. Push back your spine as much as possible towards the chair, to resemble a cat stretching backwards.
- Next, while you inhale, allow your abdomen to return to its normal state and look up towards the ceiling as much as your neck allows. Or, keep your head parallel to the floor. This step resembles that of a cow.
- Repeat the above steps several times.
2. Parivrtta Utkatasana (Seated Twist Chair Pose)
- Sit on a chair with a straight back and place your right hand on the left knee and your left hand on the right knee.
- Turn to look over your right shoulder and hold on to four breaths.
- While inhaling, sit up straighter and while exhaling, feel a deeper twist.
- Exhale back to the starting position and repeat on the other side.
3. Chair Kapotasana (Chair Pigeon Pose)
- Sit on a chair with a straight back and keep your right ankle over your left knee.
- Keep the left leg in a relaxed position, stretching it out.
- While inhaling, sit up tall and then feel the body return to its original state while you exhale.
- You can increase the stretch by placing the right hand on your right knee and then apply gentle pressure.
- For an even better stretch, maintain a flat back and a lengthened spine and then bend from the hips.
- Stay for 3 to 5 breaths and repeat the same steps with the other side.
4. Seated Chest Opener Chair Pose
- Sit on the front edge of your chair while interlacing your hands behind the back.
- Lift your hands up gradually while you inhale and also lift your chin away from the chest at the same time.
- Lower your hands while exhaling.
- Repeat the above steps at least 2 times.
- Next, switch the grip of your hands and repeat the same steps again.
5. Utkatasana (Chair Pose)
Utkatasana benefits include imparting mental strength to the mind and balance to your body. Utkatasana benefits also extend to strengthening the torso and lower back, tones your knee, leg, ankle, and thigh, while also exercising the spine, chest, and hips.
- For beginning with the Utkatasana position, stand with your feet a little apart.
- Stretch your hands to the front with your palms facing downwards and parallel to the floor.
- Bend your knees and push your pelvis down slowly to mimic the position of you sitting on a chair.
- Straighten your spine and relax.
- Gradually lower your buttocks but esure your knees don’t go beyond your toes.
- Keep going down till you are sitting in an imaginative crossed-legged posture to complete one step of Utkatasana.
- Finally, you can lie down on your back and relax, if you want.
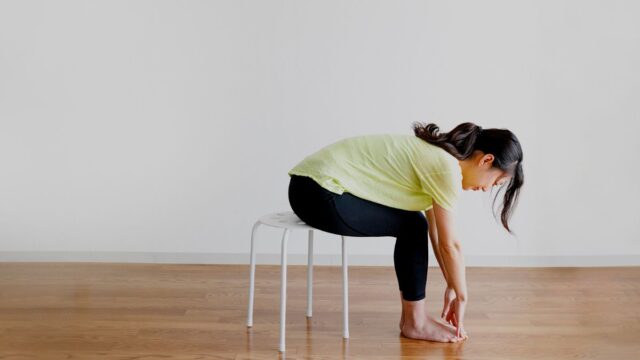
6. Paschimottanasana (Seated Forward Bend Pose)
- Sit on a chair with your hands on your thighs and then inhale deep.
- Bend forward at your hips and rest your torso over your thighs.
- Stretch your hands down towards the floor. You can either let your hands dangle till the floor or you can hold each of the elbows with the other hand.
- Relax your neck and head over your hand.
- Let your hands rest on the thighs before turning to the starting position.
7. Parvatasana (Seated Mountain Pose)
This posture specialises in engaging your core and also enables you to improve focus on your breath.
- For this chair pose, sit on the chair and take a deep breath while lengthening your spine.
- Push the bone at the bottom of your pelvis into the chair, so your legs form a 90-degree angle.
- Exhale while taking another deep breath and roll the shoulders down and stretch it at the back.
- Engage your core muscles gently and reax arms by your sides.
- Hold the posture for about 1 minute while breathing normally.
- Repeat the above steps several times.
8. Virabhandrasana (Seated Warrior I)
This posture works its magic to improve blood circulation and helps you stretch.
- While seating in the same posture as for the Seated Mountain Pose, raise your hands over your head while inhaling gradually. Keep the thumbs out and the remaining 4 fingers pointed.
- Roll the shoulders back while exhaling.
- Take 5 deep breaths before bringing arms back to your sides.
9. Paschimottansana Chair (Chair Forward Bend)
This posture works wonders in stretching your back muscles and also lengthens your spine.
- Sit on a chair and inhale while placing your arms on your thighs.
- Keep the spine straight and bend forward as much as you can while exhaling.
- Let your arms hang loose down to the floor to intensify the stretch.
- Take at least 5 breaths before returning to the starting position while exhaling.
10. Parivrtta Sukhasana (Simple Seated Twist)
This position helps boost your digestive system and lower your back pain.
- Raise your hands up and out from the sides, with the fingers pointed, while keeping your spine extended.
- Gently twist to the right while exhaling.
- Bend forward while lowering your arms and let it gently rest on the back of the chair.
- Look back over your right shoulders and hold the position for 5 breaths.
- Return to the starting position and repeat the same steps with the other side.
11. Parivrtta Utkatasana (Revolved Chair Pose)
- Sit your knees joined together, exerting your body weight on your heels.
- Bring your hands together into a prayer or namaskar pose at the centre of your chest.
- Inhale so your back lengthens and then exhale so your body contracts.
- Next, twist your torso to the right, while keeping your left elbow outside your right thigh.
- Press your palms together so that there’s more space between your collarbones.
- Keep your knees together and lower your hips an extra inch.
- Hold this for 3 to 5 breaths before releasing to a forward fold.
- Return to the chair and repeat the same with the other side.
3 Relaxation Techniques To Follow After Performing Chair Yoga Poses
1. Hydrate
Replenish the water content that your body has just lost with as much liquid as possible, in the form of water, coconut water, black or green tea, and fresh fruit juices. This is necessary to maintain flexibility of your muscles, prevent your muscles from becoming sore, and also for building strength. Alternatively, you can grab a low-sugar protein shake or sports drink. These beverages comprise electrolytes like sodium and potassium that help prevent and relieve muscle cramps. However, hydrating your body with liquid does not imply you can fall back on any beverage. Caffeinated drinks, alcohol, and overly sugary ones are to be strictly avoided. Also, take a break of 10 minutes after a workout routine before hydrating yourself.
2. Replenish Your Body With Energy
Give yourself a break of about 45 minutes after a workout routine before treating yourself to a healthy snack enriched with protein and carbs. It will restore necessary nutrition in your muscles, initiating the recovery process. Carbohydrates restore glycogen levels, enabling your body to be charged up with energy again. On the other hand, protein is essential for the recovery of your muscles and generates amino acids that rebuild muscles and repair your body, wherever necessary.
3. Relax
Before you reach out for healthy liquids and snacks, take rest. This allows your heart rate to return to its normal rate gradually. It also controls your blood from accumulating in the lower parts of the body, which can make you feel dizzy and lightheaded. A few moments of rest helps relieve stress, preventing injuries and muscle soreness. After a workout, practise Savasana for 5 minutes to give your body enough stability to go back to your daily chores. Similarly, Chair Suryanamaskar can also be performed in the same way as the traditional pose with the only difference being that you’ll be seated on a chair.
One of the easiest yet effective yoga postures, chair yoga asana has been riding on the fitness trend for some time now. Introduce some of the above asanas in your fitness routine to boost overall health. This is essential suitable for obesity, neurological problems, and for those who cannot sit on the floor due to restricted movements. That apart, it is also a viable option if you are looking for some light exercises after consecutive days of a rigorous workout routine.
Open up like never before and participate in conversations about beauty, entrepreneurship, mental health, menstrual & sexual health, and more. Desi women, join our community NOW!


